Well, I never did manage to get out on the lake last weekend... Lake Travis was closed by Mansfield damn due to planes and helicopters picking up loads of water to fire fight.
In other news, enroute to work this past Tuesday I crashed my motorcycle. Minimal damage to the bike, I rode it home after adjusting the clutch lever. Me? Sprained wrist, scraped knee, huge bruise on my side, and the piece de resistance: a cracked or separated rib. I'm already feeling pretty spry, but the rib will keep me from working on the boat this weekend at the least.

Saturday, September 17, 2011
Wednesday, September 7, 2011
The Trifecta
So I was lucky enough to have Labor Day off this week, and this past Saturday I realized the schedule might work out to get a sanding session in on each day of the long weekend. Saturday worked out, although I ended up sanding in the evening. Sunday morning, more sanding, but then we went to a pool party where the host smoked a brisket. Delicious! Monday morning came around and I was up early with the kids, but couldn't manage to hit the trifecta. Someone had a hangover, and then we went to another pool party in the afternoon.
At least I made the attempt.. I achieved more than I would have otherwise, and every hour spent on a project helps me understand the scope and the possibilities.
In other news, I *might* get out on the lake this coming weekend, even with lake levels at low low levels.
At least I made the attempt.. I achieved more than I would have otherwise, and every hour spent on a project helps me understand the scope and the possibilities.
In other news, I *might* get out on the lake this coming weekend, even with lake levels at low low levels.
Wednesday, August 31, 2011
Mid Week Sanding
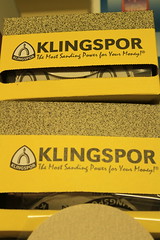
Mid week sanding is kinda like a businessman's special at the ball park, except without the hot dog vendors. The schedule lined up and I jumped at the opportunity, by the time I got outside I was working in the shade on the starboard side. Something interesting I've noticed with the new Klingspor sandpaper is that it seems to last me about a half hour before it's torn up or I'm ready to get a fresh piece. With sandpaper it's hard to know exactly when to freshen up, and certainly some of the paper has more life in it, but when you're sanding the same spot for a while, it's probably time.
Saturday, August 27, 2011
Man It's Hot Out
As I mentioned before, I've been sanding the port side of the boat more than the starboard, because I usually get out there on Saturday mornings. Last weekend I spent about an hour, and today another hour going at it, and I'm definitely making progress. I would say I'm about 1/4 of the way through the bottom sanding, so another 15 hours or so should do the trick. With temperatures over 100 F, this time of year can be tough to work for any long stretch of time, but things will be cooling down soon enough.
Wednesday, August 3, 2011
It's dead Jim
Well, no sanding recently, but on the bright side - at least I have a new sander coming my way.
It should be here over the next week or so, then after a little vacation it's back to work!
It should be here over the next week or so, then after a little vacation it's back to work!
Sunday, July 3, 2011
More sanding..
When you've got 31 feet of water line, that means there's a fair amount of bottom. Sanding to prep for new bottom paint might normally be a quick job, but in this particular case there are, at the least, several coats of paint preexisting in various conditions. Never the less, an hour here and there will eventually add up - witness the before and after pictures from this morning.
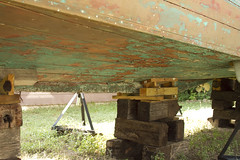
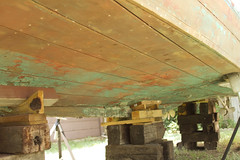
I also sanded along the chine at the bow, not pictured here.
The hardest part of any project is making the time, and returning to it consistently. This is something I still struggle with, but without consistency the project takes even longer.
Another interesting thing about this stage of sanding is that it's a lot more comfortable to do in the shade, so I've been focusing on the port side of the boat. I'm going to have to start sanding in the evenings (or rotate the boat!) to get the starboard side sanded.
Saturday, June 18, 2011
Look what the cat dragged in!
By "cat" I mean UPS delivery chick, and by "dragged in", naturally I mean delivered:
 200 sweet sweet sheets of sandpaper goodness! I spent today fiddling with other things (motorcycles) but Father's day is going to start with a nice dose of sanding, before the temperature gets into triple digits.
Sunday, June 12, 2011
Sandpaper: a precious resource?
Back in March or April, I knew there was a lot of sanding on the schedule. The box store had limited grits and quantities, so I ordered a box of 80 and a box of 220 from a local power tool supply and repair shop. I made the order before I started on the porch roof project, because I knew the grits required would overlap. I got a call that part of the order was in a couple weeks later - the 220 grit. That's the second step naturally, so I said "call me when the 80 grit is in!". A few weeks later, I get another call, this time the order is in for sure. I go back, there's one box. It's the 220 grit still, no 80 grit to be found. I muddle through the porch ceiling with some 60 grit (luckily I ended up using deck stain, so the finish wasn't required to be as nice). I completed that, and last weekend I used up the last of the 60 grit sanding some of the tough spots on the hull. So here I am out of sandpaper again!
Yesterday I placed an order with an online firm for the 80 grit sandpaper, with any luck it'll be here next week. More sanding pictures to follow!
Yesterday I placed an order with an online firm for the 80 grit sandpaper, with any luck it'll be here next week. More sanding pictures to follow!
Friday, June 3, 2011
To Be Perfectly Fair
To be perfectly fair to myself, it hasn't been 3 months since I've done any work on the Connie. I did finish sanding and staining the porch ceiling last weekend, and my number one priority this weekend is to sand more bottom. We did go out of town for 10 days, and I did slow down with a cold for a few days, but we're quickly moving past that and onto new projects. Or at least more sanding.
I recently joined the Chris Craft Antique Boat Club - they have a forum that I've been monitoring since the boat first arrived, gleaning knowledge slowly. One cool advantage of reading about other projects / maintenance / use is that you can see others facing similar challenges and succeeding, I find it very motivating to catch a glimpse of others in similar situations...
I recently joined the Chris Craft Antique Boat Club - they have a forum that I've been monitoring since the boat first arrived, gleaning knowledge slowly. One cool advantage of reading about other projects / maintenance / use is that you can see others facing similar challenges and succeeding, I find it very motivating to catch a glimpse of others in similar situations...
Saturday, April 23, 2011
In case of weather...

What is this pile of scrap, you say? It turns out that it's the original weather cloths. They're in a very fragile state, so they can't be used, but I plan to use them as a pattern when we get around to that stage of things.
The weather cloths snap onto the edges of the cockpit roof and sides, and provide a weather proof (resistant?) protection. The previous owner called me a few weeks ago and told me he found these, plus the original owners manual (!) and the cabin key. Naturally I was pretty excited to reunite these items with the boat.
Porch sanding still proceeds at a snail's pace, and I have more sand paper on order...
Saturday, April 16, 2011
A detailed observation...
Anyone with a little knowledge of wood, or wooden boats, can immediately gleam from this picture an important detail:

It's not any part of a boat. In fact, as I mentioned in my last post, it's the ceiling to my porch, and I've been sanding it little by little. This particular shot doesn't show any of the new boards, but suffice it to say they don't match the existing color very well. The blog has been quiet recently because there's been very little boat work since I started this sanding project. With any luck I'll have it wrapped up soon, although I did manage to obtain something pretty neat that's boat related. More about that soon...
Saturday, March 19, 2011
A brief intermission...
My goal is to use this blog to document what I'm working on, and keep myself motivated, hopefully with a post or two a week. This past week I haven't managed to do anything boat wise, because I've been working on my back porch. Last winter, during the hard freeze Austin received, the water pipes feeding the spickets in the porch ceiling broke, necessitating some emergency repairs. Finally it's time to close up the pine tongue and grove ceiling. Once that's done it's back to sanding, sanding, sanding...
Friday, March 11, 2011
Not my natural color...
 I managed to get in about an hour of sanding yesterday after work, the weather was perfect for practically any outdoor activity. As you can see, sanding can be quite dusty. I try not to sand on back to back days because it's pretty harsh on the skin.
 I'm down to my last round of 100 grit, and this weekend I fully intend to stock up, this time on 80 grit. There are a few spots that could stand some tough love, especially under the waterline but above water, if you catch my drift. For some reason, the paint in that area is much harder than the stuff that's spent 12 years under water.
 I had a little helper for a brief moment.. he didn't really achieve much though.


Something that's been interesting to see is the many layers of bottom paint. I think I counted 6 layers on the waterline, and you can see here that the undermost pain was red, followed by a couple more coats of red, and then most recently the blue / green. When the bottom gets paint, I'm going to go with the original color scheme of red bottom, blue waterline, and white top.

Some other tricks I have been considering: sanding the area directly "under" the chine, forward where the chine curves up and in. "My" orbital sander is a 5 incher, and it's way too big to get in there. I'm thinking belt sander, or (hopefully not) sanding by hand. Also, the blocks will have to be moved one by one. I almost think that although the outer supports can be easily worked, the three railroad tie stacks might stay where they are until the boat heads back to the water.
As things move forward, my next projects are replacing the rotten board in the transom (and any related rot found), and replacing the canvas cabin top. Both projects seem simple but almost certainly will be a tangled web.
Saturday, March 5, 2011
Origin 2: More Origin
Every time someone new sees the boat in our backyard, they always say something like "Holy s$%*! How'd you get that in here?" I always say, "Well, I paid a guy..". The larger point though is that my home is on a corner lot, and along one side, the fence has a gate cut into it. With the gate open, it was relatively easy to back the boat in. The next question people invariably ask is "Does it run?" to which I reply "It was floating when I got it.", thus summing up the state and condition of the project. Now that I've contacted the previous owner and gotten some back story, I sometimes add "Not since the late '80s."
I mentioned a surprise in the first origin post, and it is true that shortly after we acquired this boat, we found out we were going to acquire something else, too. I won't put the picture here (because I'm lazy), but this explains our new delivery on March 23rd 2010. http://www.flickr.com/photos/chaoticwhimsey/4476892812/in/set-72157623735350302/
 |
| You can see the lock on the gate in the very middle of the fence, plenty of room! |
So with that happening, then some job instability, etc, the project got off track quite a bit in 09 and 10. Things are looking up for 2011, though!
(You might be saying to yourself, well, you lazy <expletive deleted>, on a beautiful Saturday morning why aren't you out there getting on it right now? And that's a great question, which I will answer in two parts: it just stopped raining, so everything is soaking wet, and the wife is out running errands, so I'm supervising the littles. Life always interrupts.)
Tuesday, March 1, 2011
Add one more thing to the list...
The previous owner had removed some of the stainless steel trim and put it in a pvc tube, then put the tube in the cabin. It was in the way, so after relocation to our yard, I moved the tube onto the port side walkway. Yesterday I was in the back yard, and noticed that the tube had slid a little bit and was drooping over the bow. Then, yesterday evening, I saw the tube had slipped and I thought I'd better get up there and put it back. This is what I found:
Naturally I had some choice words to say.
Let this be a lesson to us all: a small problem fixed soon enough will prevent bigger problems later on.
In the grand scheme of things, this isn't the end of the world, but it is extremely frustrating. I think the windows will need some attention at some point - I have read about similar models and window configurations that leak consistently. Now it's just one more item on the check list.
 |
| This window is presumably the original, so it lasted 52 years before my laziness let it be broken. |
Naturally I had some choice words to say.
Let this be a lesson to us all: a small problem fixed soon enough will prevent bigger problems later on.
In the grand scheme of things, this isn't the end of the world, but it is extremely frustrating. I think the windows will need some attention at some point - I have read about similar models and window configurations that leak consistently. Now it's just one more item on the check list.
Friday, February 25, 2011
You call that a time table?
The weeks sure do slip by, don't they? I managed to do a little more sanding yesterday, until the rain started coming down.
Time table wise, I think the earliest I could reasonably expect to put the boat back in the water is spring 2012. I'd like to do it this year, but there's so much work to be done. (And, it's already spring here in Austin!)
Things to do before hitting the water:
finish sanding below the water line, prep (bung and fill as appropriate), prime and paint
replace the rotten board in the transom, with any necessary structural work
sand, prep, paint above water line
replace starboard trim board, reseat port trim board
replace canvas cabin top (this should be quite an adventure!)
replace rotten board on starboard side at the front of the cabin
replace / repair port prop (it has a big chunk missing!)
engine / transmission work (another tricky bit, those puppies weigh 875 pounds a piece and they need to come out to be rebuilt)
gas tanks need to be checked and cleaned / repaired / replaced
carburetor rebuilds
stain and varnish transom
forward water tank fill fitting and plumbing
After all of that is done, it could hopefully float again, and move under its own power.
Add in a few legalities such as a survey and insurance, and then you have a floating project instead of a backyard project. Naturally some of the items above require a financial aspect, and planning those things out affects the time table as well. Left out of the list, except for the cabin top, are the more cosmetic items like exterior stain and varnish, the forward deck, etc, etc.
When you put it like that, it seems like a lot of work!
Saturday, February 19, 2011
It's snowing!
I'm about 1600 plus miles from the boat this weekend, and to beat that, it is snowing here at the French Creek Alpaca Farm. Naturally, no work is being done on the ol' Chris Craft. I like the annual visit to the relatives, and it makes me very appreciative of the warmer weather we get in Austin.
I thought I might clarify for the audience the purpose of the blog: this is mostly an endeavor to track my progress and document what has been done, needs to be done, etc. I plan to have a timetable with the tasks and estimates over the next week or two. Also, I would like to point out that posts will generally be related to boat work, hopefully one or two a week. With so much to do, and the boating season approaching at full steam, I intend to make this coming warm season a fruitful one.
I thought I might clarify for the audience the purpose of the blog: this is mostly an endeavor to track my progress and document what has been done, needs to be done, etc. I plan to have a timetable with the tasks and estimates over the next week or two. Also, I would like to point out that posts will generally be related to boat work, hopefully one or two a week. With so much to do, and the boating season approaching at full steam, I intend to make this coming warm season a fruitful one.
Monday, February 14, 2011
Ok, but where are we now?
As you might be wondering, if the previous post is the "origin" story, what is the current status of this project?
Well, progress has been what you might call "slow". Glacial, really, and I could make excuses, but instead I'll tell you what *has* been done over the past 18 months. To start, I scraped the loose paint off of the bottom using a hand scraper. Then, I removed the exhaust trim and sanded the transom, tsk tsking the rot along the water line and in the corners. I removed the trim along the stem below the waterline, and then I started sanding the bottom, starboard side first. I've worked my way forward above the chine, and the last sanding I did (2/12/11), I spent about an hour on the port side of the bow below the chine.
Well, progress has been what you might call "slow". Glacial, really, and I could make excuses, but instead I'll tell you what *has* been done over the past 18 months. To start, I scraped the loose paint off of the bottom using a hand scraper. Then, I removed the exhaust trim and sanded the transom, tsk tsking the rot along the water line and in the corners. I removed the trim along the stem below the waterline, and then I started sanding the bottom, starboard side first. I've worked my way forward above the chine, and the last sanding I did (2/12/11), I spent about an hour on the port side of the bow below the chine.
 |
| The sanding I've done on the bow, in two photos that show where I'm headed next, joined because blogger can't put two pictures on the same line?? |
As you can see, I'm not going all the way down to bare, bare wood. There are lots of reasons for this, as follows. Any paint that is still there after I've gone by with the sander is stuck pretty well, so I might need a rougher sand paper. (I'm using 100 grit right now.) The sanding is uncovering blemishes (look at that nasty one 3 boards below the water line!) which will require more sanding later. Lastly, I don't want to spend the rest of my life sanding! (Then why did you jump into a wooden cruiser project?!)
Saturday, February 12, 2011
I know nothing about mahogany Chris Craft, let's get one!
It was a warmish, breezy day in April or May 2009. It had to be breezy and warm because my friend (let's call him Double D) and I were going out sailing. As we prepared his boat, he told me that the marina was trying to get rid of an old Chris Craft. On the way out, he pointed it out to me, and I saw just enough to know that it had some interesting lines. It immediately reminded me of a hot rod; a jaunty visor over the short windshield. My view was occluded though, and I did not see the whole boat until we returned. Once I got another look at the boat, I realized my first view had been of the bow and the first 2 feet of the cabin. The "windshield" I had seen was actually the forward windows of the cabin, and I was surprised to find it extended quite a bit further, perhaps another 6 foot of cabin, and 6 or 8 more for the cockpit and aft deck.
I was pretty excited about the boat in question, and when I got home naturally I discussed it with my girlfriend. We agreed to have another look at the boat, and I did some searching on the internet to try and figure out what make, model and year we were considering. I contacted a boat transport guy and discussed the dismal level of the lake. All of this contemplation led us into August 2009, the lowest levels Lake Travis had seen since before the boat was constructed! Little did we know a big surprise awaited us...

I was pretty excited about the boat in question, and when I got home naturally I discussed it with my girlfriend. We agreed to have another look at the boat, and I did some searching on the internet to try and figure out what make, model and year we were considering. I contacted a boat transport guy and discussed the dismal level of the lake. All of this contemplation led us into August 2009, the lowest levels Lake Travis had seen since before the boat was constructed! Little did we know a big surprise awaited us...

Subscribe to:
Posts (Atom)